The Pioneer Plaque
An interactive guide to the Pioneer plaque, the engraved message NASA sent beyond the Solar System in 1972, decoded one element at a time.
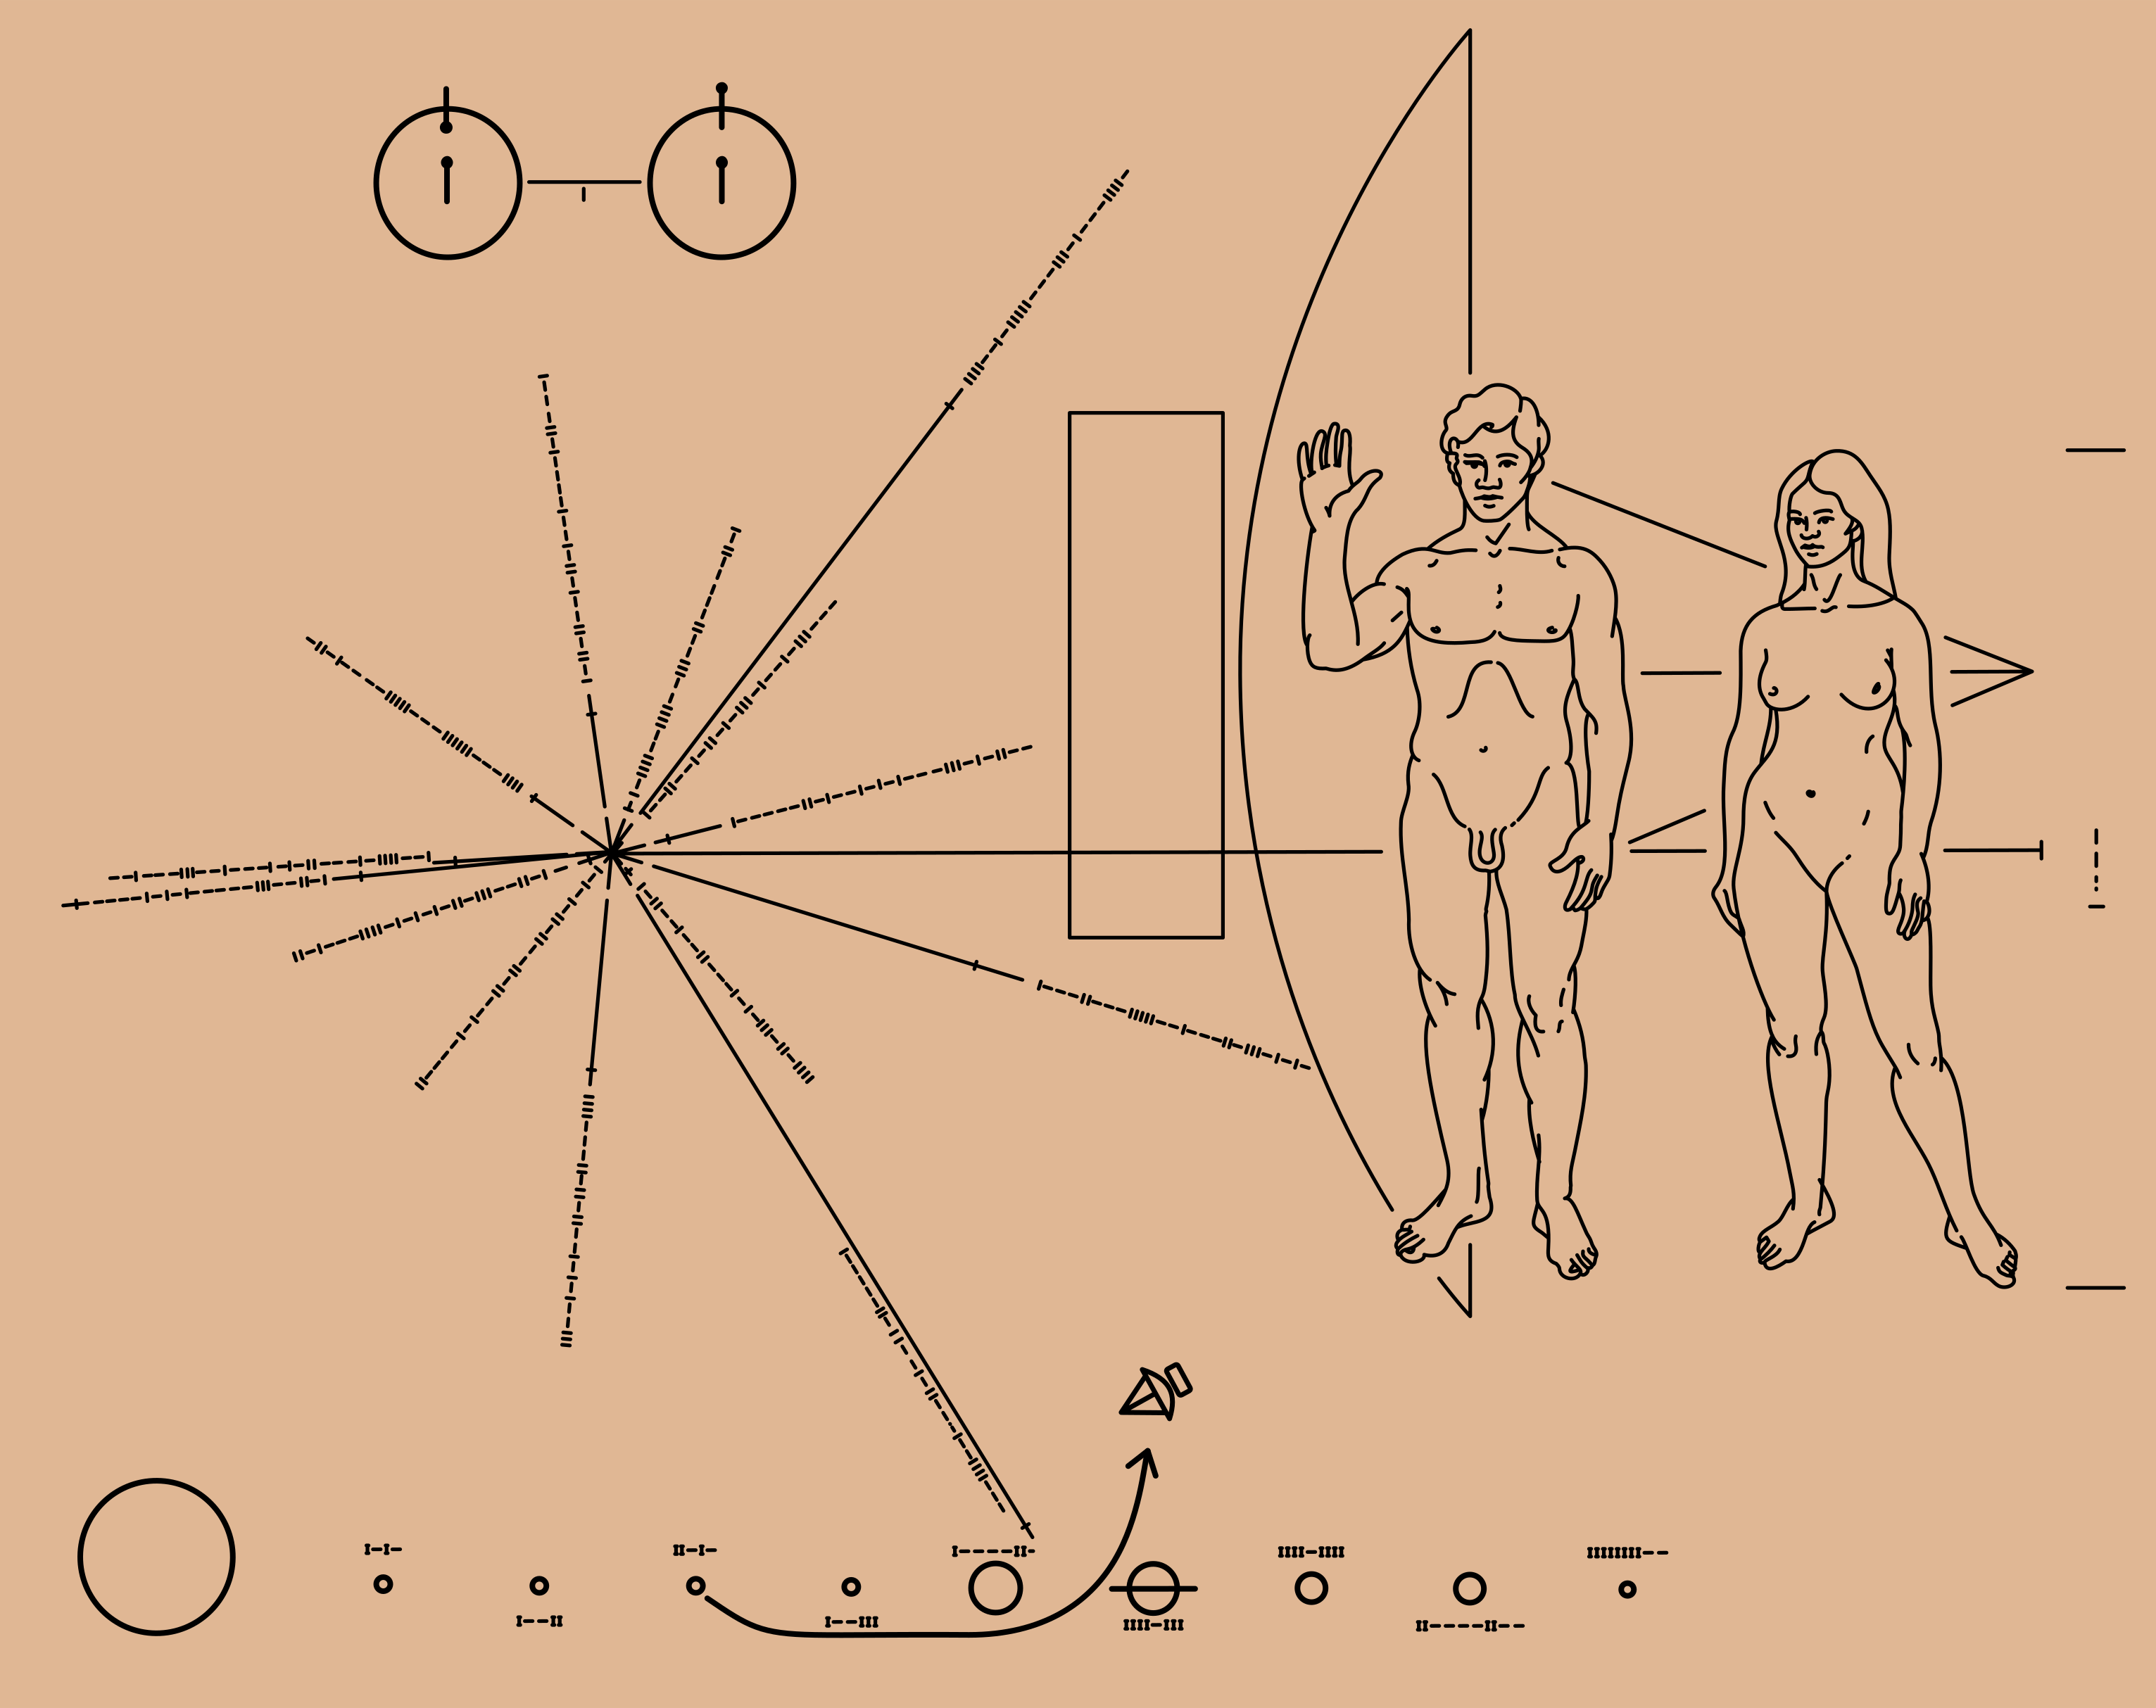
Before the Voyager probes carried their Golden Records out of the Solar System in 1977, NASA had already sent a message along with Pioneer 10 and 11: a gold-anodised aluminium plaque designed by Carl Sagan and Frank Drake, with artwork by Linda Salzman Sagan. Its picture language returns on the cover of the Voyager records, which reuse the plaque’s hydrogen key and pulsar map. Scroll down to walk through the plaque one element at a time.
01Hydrogen
This diagram shows the two lowest energy states of the hydrogen atom, the most common element in the universe.
The vertical lines with the dots mark the spins of the proton and the electron: in one state they are aligned, in the other they are opposed.
When the spin flips, the atom emits radio waves at 1420 MHz, with a wavelength of 21 cm and a period of 0.7 nanoseconds. This transition is the fundamental clock and ruler for everything else on the plaque.
The vertical lines with the dots mark the spins of the proton and the electron: in one state they are aligned, in the other they are opposed.
When the spin flips, the atom emits radio waves at 1420 MHz, with a wavelength of 21 cm and a period of 0.7 nanoseconds. This transition is the fundamental clock and ruler for everything else on the plaque.
02The unit
The short vertical stroke below the line between the two states is the binary digit 1.
It sets the units for the rest of the plaque: one unit of length is 21 cm, and one unit of time is 0.7 nanoseconds.
It sets the units for the rest of the plaque: one unit of length is 21 cm, and one unit of time is 0.7 nanoseconds.
03The senders
On the right stand a man and a woman, showing what the senders look like.
The man raises his right hand in greeting, a gesture that also shows the opposable thumb and how our limbs move.
The man raises his right hand in greeting, a gesture that also shows the opposable thumb and how our limbs move.
04Height
Next to the woman, a bracket marks her height. Between its ends sits the binary number 1000: eight.
Eight times the hydrogen unit of 21 cm gives 168 cm.
Eight times the hydrogen unit of 21 cm gives 168 cm.
05The spacecraft
Behind the figures is the outline of the Pioneer spacecraft itself, drawn at the same scale.
Whoever finds the probe can measure it and work out how tall we are, even without decoding the binary.
Whoever finds the probe can measure it and work out how tall we are, even without decoding the binary.
06Pulsar map
On the left, fourteen lines radiate from the Sun. Each points to a pulsar, a spinning neutron star that sends out radio pulses as regular as a clock.
The length of each line shows the pulsar's relative distance from the Sun, and the tick at its end shows its height above or below the galactic plane.
The long binary numbers along the lines are the pulsar periods, counted in hydrogen time units. Because pulsars slow down over time, these periods also reveal when the probe was launched.
The length of each line shows the pulsar's relative distance from the Sun, and the tick at its end shows its height above or below the galactic plane.
The long binary numbers along the lines are the pulsar periods, counted in hydrogen time units. Because pulsars slow down over time, these periods also reveal when the probe was launched.
07Galactic centre
A fifteenth line runs far to the right, behind the human figures. It shows the Sun's relative distance to the centre of the Milky Way.
With this many reference points, a finder could triangulate our position, even if they only recognised some of the pulsars.
With this many reference points, a finder could triangulate our position, even if they only recognised some of the pulsars.
08Solar System
Along the bottom lies our Solar System: the Sun on the left, followed by the nine planets known in 1972, from Mercury out to Pluto.
Saturn is recognisable by its ring.
Saturn is recognisable by its ring.
09Planet distances
Above and below the planets, binary numbers give each planet's distance from the Sun, in units of one tenth of Mercury's orbit.
Here the binary is written with I for one and – for zero.
Here the binary is written with I for one and – for zero.
10Trajectory
Finally, a small image of the spacecraft leaves the third planet, swings past Jupiter and heads out of the Solar System: the trajectory of the probe that carries the plaque.
The same plaque flew on Pioneer 11, whose path does not match the drawing: after launch it was redirected towards Saturn.
The arrow is also the most criticised symbol on the plaque: it may only mean "this way" to a civilisation that once hunted with pointed projectiles.
The same plaque flew on Pioneer 11, whose path does not match the drawing: after launch it was redirected towards Saturn.
The arrow is also the most criticised symbol on the plaque: it may only mean "this way" to a civilisation that once hunted with pointed projectiles.
11The whole plaque
Put together, the plaque tells whoever finds it who sent it, where from, and when.
Five years later, Voyager 1 and 2 carried the same hydrogen key and pulsar map on the covers of their Golden Records.
Five years later, Voyager 1 and 2 carried the same hydrogen key and pulsar map on the covers of their Golden Records.
12The object
The message itself is a gold-anodised aluminium plate, slightly larger than a sheet of A5 paper.
It is attached to the antenna support struts of Pioneer 10, where it is shielded from erosion by interstellar dust.
It is attached to the antenna support struts of Pioneer 10, where it is shielded from erosion by interstellar dust.
- Material
- 6061-T6 aluminium, gold-anodised
- Size
- 229 × 152 mm (9 × 6 in)
- Thickness
- 1.27 mm
- Engraving
- 0.381 mm deep on average
- Mass
- About 120 g
- Design
- Carl Sagan and Frank Drake, artwork by Linda Salzman Sagan
- Launched
- Pioneer 10, 2 March 1972; Pioneer 11, 5 April 1973
Sources and links
- Wikipedia, Pioneer plaque: the main source for the meaning of each element and the plaque’s physical properties.
- Wikipedia, Pioneer 10: launch, mission and spacecraft details.
- Vsauce, Messages For The Future: how the plaque’s units, pulsar map and trajectory work, and the criticism of its arrow.
- Plaque drawing: NASA, public domain, via Wikimedia Commons.
- Pioneer 10 drawing: public domain, derivative of a NASA systems diagram by Lsanabria, via Wikimedia Commons.
- The line-drawing animation uses the
pathLengthtechnique from CSS-Tricks. - The companion post on the Voyager Golden Record, whose cover reuses this plaque’s hydrogen key and pulsar map.